A sequencer generates data transactions as class objects and sends it to the Driver for execution. It is recommended to extend uvm_sequencer base class since it contains all of the functionality required to allow a sequence to communicate with a driver. The base class is parameterized by the request and response item types that can be handled by the sequencer.

What is a driver ?
UVM driver is an active entity that has knowledge on how to drive signals to a particular interface of the design. For example, in order to drive a bus protocol like APB, UVM driver defines how the signals should be timed so that the target protocol becomes valid. All driver classes should be extended from uvm_driver, either directly or indirectly.
Transaction level objects are obtained from the Sequencer and the UVM driver drives them to the design via an interface handle.
Class Hierarchy

Steps to create a UVM driver
1. Create custom class inherited fromuvm_driver, register with factory and call new
// my_driver is user-given name for this class that has been derived from "uvm_driver"
class my_driver extends uvm_driver;

  	// [Recommended] Makes this driver more re-usable
  	`uvm_component_utils (my_driver)

  	// This is standard code for all components
  	function new (string name = "my_driver", uvm_component parent = null);
    	super.new (name, parent);
  	endfunction

  	// Code for rest of the steps come here
endclass
  	// Actual interface object is later obtained by doing a get() call on uvm_config_db
  	virtual if_name vif;

  	virtual function void build_phase (uvm_phase phase);
  		super.build_phase (phase);
     	if (! uvm_config_db #(virtual if_name) :: get (this, "", "vif", vif)) begin
        	`uvm_fatal (get_type_name (), "Didn't get handle to virtual interface if_name")
     	end
	endfunction
run_phase
	// This is the main piece of driver code which decides how it has to translate
	// transaction level objects into pin wiggles at the DUT interface
	virtual task run_phase (uvm_phase phase);
		// Loop the following steps
		// 1. Get next item from the sequencer
		// 2. Assign data from the received item into DUT interface
		// 3. Finish driving transaction
	endtask

UVM Driver-Sequencer handshake
UVM driver is a parameterized class which can drive a specific type of transaction object. The driver has a TLM port of type uvm_seq_item_pull_port which can accept the parameterized request object from the uvm_sequencer. It can also provide a response object back to the sequencer and usually the class type of both request and response items are the same. However, they can be different if explicitly specified.
The UVM driver uses the following methods to interact with the sequencer.
| Method Name | Description |
| get_next_item | Blocks until a request item is available from the sequencer. This should be followed by item_done call to complete the handshake. |
| try_next_item | Non-blocking method which will return null if a request object is not available from the sequencer. Else it returns a pointer to the object. |
| item_done | Non-blocking method which completes the driver-sequencer handshake. This should be called after get_next_item or a successful try_next_item call. |
How are driver/sequencer API methods used ?
The idea behind a driver/sequencer handshake mechanism is to allow the driver to get a series of transaction objects from the sequence and respond back to the sequence after it has finished driving the given item so that it can get the next item.
1.get_next_item followed by item_doneThis use model allows the driver to get an object from the sequence, drive the item and then finish the handshake with the sequence by calling item_done(). This is the preferred use model since the driver need to operate only when the sequencer has an object for the driver. Here, finish_item call in the sequence finishes only after the driver returns item_done call.
	virtual task run_phase (uvm_phase phase);
		my_data req_item;

		forever begin
			// 1. Get next item from the sequencer
			seq_item_port.get_next_item (req_item);

			// 2. Drive signals to the interface
			@(posedge vif.clk);
			vif.en <= 1;
			// Drive remaining signals, put write data/get read data

			// 3. Tell the sequence that driver has finished current item
			seq_item_port.item_done();
		end
get followed by putThe difference between this model and the previous one is that here, the driver gets the next item and sends back the sequence handshake in one go, before the UVM driver processes the item. Later on the driver uses the put method to indicate that the item has been finished. So, finish_item call in the sequence is finished as soon as get() is done.
	virtual task run_phase (uvm_phase phase);
		my_data req_item;

		forever begin
			// 1. finish_item in sequence is unblocked
			seq_item_port.get (req_item);

			// 2. Drive signals to the interface
			@(posedge vif.clk);
			vif.en = 1;
			// Drive remaining signals

			// 3. Finish item
			seq_item_port.put (rsp_item);
		end
	endtask
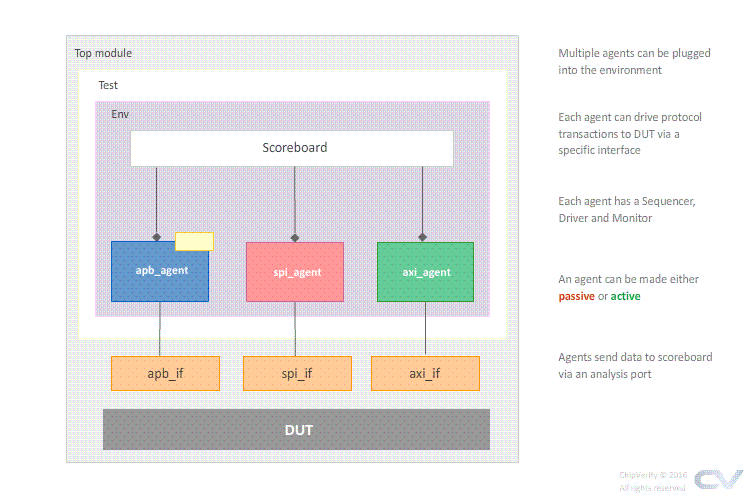
What is a UVM agent ?
An agent encapsulates a Sequencer, Driver and Monitor into a single entity by instantiating and connecting the components together via TLM interfaces. Since UVM is all about configurability, an agent can also have configuration options like the type of UVM agent (active/passive), knobs to turn on features such as functional coverage, and other similar parameters.

Types of Agents
| Active |
|
| Passive |
|
How to find out if a UVM agent is active or passive ?
User-defined agent classes derived from uvm_agent also have another function called get_is_active() which will return the state of the requested UVM agent.
	// Assume this is inside the user-defined agent class
	if (get_is_active()) begin
		// Build driver and sequencer
	end
	// Build monitor
Class Hierarchy

Steps to create a UVM agent
1. Create a custom class inherited fromuvm_agent, register with factory and callnew
// my_agent is user-given name for this class that has been derived from "uvm_agent"
class my_agent extends uvm_agent;

    // [Recommended] Makes this agent more re-usable
    `uvm_component_utils (my_agent)

    // This is standard code for all components
    function new (string name = "my_agent", uvm_component parent = null);
      super.new (name, parent);
    endfunction

    // Code for rest of the steps come here
endclass
	// Create handles to all agent components like driver, monitor and sequencer
	// my_driver, my_monitor and agent_cfg are custom classes assumed to be defined
	// Agents can be configured via a configuration object that can be passed in from the test
	my_driver                  m_drv0;
    my_monitor                 m_mon0;
    uvm_sequencer #(my_data)   m_seqr0;
    agent_cfg                  m_agt_cfg;
      virtual function void build_phase (uvm_phase phase);

		 // If this UVM agent is active, then build driver, and sequencer
         if (get_is_active()) begin
            m_seqr0 = uvm_sequencer#(my_data)::type_id::create ("m_seqr0", this);
            m_drv0 = my_driver::type_id::create ("m_drv0", this);
         end

         // Both active and passive agents need a monitor
         m_mon0 = my_monitor::type_id::create ("m_mon0", this);

         //[Optional] Get any agent configuration objects from uvm_config_db
      endfunction
      virtual function void connect_phase (uvm_phase phase);

		 // Connect the driver to the sequencer if this agent is Active
         if (get_is_active())
            m_drv0.seq_item_port.connect (m_seqr0.seq_item_export);
      endfunction
What does a UVM agent do ?
Usually, it makes sense to create an agent that provides protocol specific tasks to generate transactions, check the results and perform coverage. For example, a UVM agent can be created for the WishBone protocol whose sequencer will generate data items which can be sent to the driver. The driver then converts the data item class object into actual pin level signals and drive them to the DUT. The monitor may passively collect the outputs from the DUT, convert them back into another data item class object and distribute it among all the components in the testbench waiting for the item.
There is a third type of fork join in SystemVerilog which is fork and join_none.
A fork and join_none will allow the main thread to resume execution of further statements that lie after the fork regardless of whether the forked threads finish. If five threads are launched, the main thread will resume execution immediately while all the five threads remain running in the background.
Syntax
	fork
		// Thread 1
		// Thread 2
		// ...
		// Thread N
	join_none
fork join_none Example
module tb;
	initial begin
      $display ("[%0t] Main Thread: Fork join going to start", $time);
		fork
          print (20, "Thread1_0");
          print (30, "Thread1_1");
          print (10, "Thread2");
		join_none
      $display ("[%0t] Main Thread: Fork join has finished", $time);
	end

  // Note that we need automatic task
  task automatic print (int _time, string t_name);
    #(_time) $display ("[%0t] %s", $time, t_name);
  endtask
endmodule
ncsim> run
[0] Main Thread: Fork join going to start
[0] Main Thread: Fork join has finished
[10] Thread2
[20] Thread1_0
[30] Thread1_1
ncsim: *W,RNQUIE: Simulation is complete.
Nested fork join_none
module tb;
	initial begin
      $display ("[%0t] Main Thread: Fork join going to start", $time);
		fork
          begin
			fork
              print (20, "Thread1_0");
              print (30, "Thread1_1");
            join_none
            $display("[%0t] Nested fork has finished", $time);
          end
          print (10, "Thread2");
        join_none
      $display ("[%0t] Main Thread: Fork join has finished", $time);
	end

  // Note that we need automatic task
  task automatic print (int _time, string t_name);
    #(_time) $display ("[%0t] %s", $time, t_name);
  endtask
endmodule
ncsim> run
[0] Main Thread: Fork join going to start
[0] Main Thread: Fork join has finished
[0] Nested fork has finished
[10] Thread2
[20] Thread1_0
[30] Thread1_1
ncsim: *W,RNQUIE: Simulation is complete.
Why do we need automatic task ?
Without automatic keyword, the same display task with different string tags will produce the same display message. This is because multiple threads call the same task and share the same variable in tool simulation memory. In order for different threads to initiate different copies of the same task, automatic keyword has to be used.
module tb;
  initial begin
      $display ("[%0t] Main Thread: Fork join going to start", $time);
    fork
          print (20, "Thread1_0");
          print (30, "Thread1_1");
          print (10, "Thread2");
    join_none
      $display ("[%0t] Main Thread: Fork join has finished", $time);
  end

  // Note that this is not an automatic task, its static
  task print (int _time, string t_name);
    #(_time) $display ("[%0t] %s", $time, t_name);
  endtask
endmodule
ncsim> run
[0] Main Thread: Fork join going to start
[0] Main Thread: Fork join has finished
[10] Thread2
[20] Thread2
[30] Thread2
ncsim: *W,RNQUIE: Simulation is complete.
TLM 2.0 introduced socket which enables asynchronous bi-directional data transfer between the initiator and target component. A socket is derived from the same base class as ports and export - uvm_port_base. Components that initiate transactions have initiator sockets and are called initiators, while components that receive transactions have target sockets and are called targets. Note that initiator sockets can be connected only to target sockets and target sockets only to initiator sockets.
