A previous article showed examples of using a uvm_blocking_put_port TLM port that was blocking in nature where the sender gets stalled until the receiver finishes with the put task.
Similarly, UVM TLM also has a non-blocking method of type uvm_nonblocking_put_port where the sender has to use try_put to see if the put was successful or can_put method to see if the receiver is ready to accept a transfer. Like before, the UVM TLM non-blocking put port should ultimately be connected to a non-blocking put implementation port.
UVM TLM Nonblocking Put Example
A class called Packet is defined below to act as the data item that will be transferred from one component to another. This class object will have two random variables that can be randomized before sending.
// Create a class data object that can be sent from one
// component to another
class Packet extends uvm_object;
  rand bit[7:0] addr;
  rand bit[7:0] data;

  `uvm_object_utils_begin(Packet)
  	`uvm_field_int(addr, UVM_ALL_ON)
  	`uvm_field_int(data, UVM_ALL_ON)
  `uvm_object_utils_end

  function new(string name = "Packet");
    super.new(name);
  endfunction
endclass
uvm_nonblocking_put_portA class called componentA is created which has a uvm_nonblocking_put_port parameterized to accept a data object of type Packet. The port has to be instantiated with the new() method preferably in the build_phase of the same component.
In this example, a class object of type Packet is created, randomized and sent via the put_port handle by calling the try_put method. Many such packets can be sent using a simple loop controlled by a configurable variable. The try_put function should ideally return 1 if the transfer is successful and 0 if it failed and should be provided by the receiver which implements the function.
class componentA extends uvm_component;
   `uvm_component_utils (componentA)

  // Create a nonblocking TLM put port which can send an object
  // of type 'Packet'
  uvm_nonblocking_put_port #(Packet) m_put_port;
  int m_num_tx;

   function new (string name = "componentA", uvm_component parent= null);
      super.new (name, parent);
   endfunction

   // Remember that TLM put_port is a class object and it will have to be
   // created with new ()
   virtual function void build_phase (uvm_phase phase);
      super.build_phase (phase);
     m_put_port = new ("m_put_port", this);
   endfunction

  // Create a packet, randomize it and send it through the port
  // Note that put() is a method defined by the receiving component
  // Repeat these steps N times to send N packets
   virtual task run_phase (uvm_phase phase);
     phase.raise_objection(this);
     repeat (m_num_tx) begin
        bit success;
         Packet pkt = Packet::type_id::create ("pkt");
         assert(pkt.randomize ());

        // Print the packet to be displayed in log
         `uvm_info ("COMPA", "Packet sent to CompB", UVM_LOW)
         pkt.print (uvm_default_line_printer);

		// Try to put the packet through the put port
	    success = m_put_port.try_put(pkt);
	    if (success)
           `uvm_info("COMPA", $sformatf("COMPB was ready to accept and transfer is successful"), UVM_MEDIUM)
         else
           `uvm_info("COMPA", $sformatf("COMPB was NOT ready to accept and transfer failed"), UVM_MEDIUM)
      end
     phase.drop_objection(this);
   endtask
endclass
put methodThe receiver class needs to define an implementation port using uvm_nonblocking_put_imp. Since the port is nonblocking in nature, the try_put implementation is a function which has to be defined by this component.
class componentB extends uvm_component;
   `uvm_component_utils (componentB)

   // Mention type of transaction, and type of class that implements the put ()
  uvm_nonblocking_put_imp #(Packet, componentB) m_put_imp;

   function new (string name = "componentB", uvm_component parent = null);
      super.new (name, parent);
   endfunction

   virtual function void build_phase (uvm_phase phase);
      super.build_phase (phase);
      m_put_imp = new ("m_put_imp", this);
   endfunction

  // 'try_put' method definition accepts the packet and prints it.
  // Note that it should return 1 if successful so that componentA
  // knows how to handle the transfer return code
  virtual function bit try_put (Packet pkt);
    `uvm_info ("COMPB", "Packet received", UVM_LOW)
      pkt.print(uvm_default_line_printer);
      return 1;
  endfunction

  virtual function bit can_put();
  endfunction

endclass
 4. Connect port and its implementation at a higher level
The connection between a port and its implementation has to be done at a higher hierarchical level. Since both components are instantiated directly within the test class in this example, the connection between them can be done during the connect_phase of the test. If these two components were instantiated in another component or environment, they have to be connected during the connect_phase of that component or environment.
class my_test extends uvm_test;
  `uvm_component_utils (my_test)

   componentA compA;
   componentB compB;

  function new (string name = "my_test", uvm_component parent = null);
      super.new (name, parent);
   endfunction

     // Create objects of both components, set number of transfers
   virtual function void build_phase (uvm_phase phase);
      super.build_phase (phase);
      compA = componentA::type_id::create ("compA", this);
      compB = componentB::type_id::create ("compB", this);
      compA.m_num_tx = 2;
   endfunction

   // Connection between componentA and componentB is done here
   // Note that the "put_port" is connected to its implementation "put_imp"
   virtual function void connect_phase (uvm_phase phase);
     compA.m_put_port.connect (compB.m_put_imp);
   endfunction

  virtual function void end_of_elaboration_phase(uvm_phase phase);
    super.end_of_elaboration_phase(phase);
    uvm_top.print_topology();
  endfunction
endclass
UVM_INFO @ 0: reporter [RNTST] Running test my_test...
UVM_INFO /playground_lib/uvm-1.2/src/base/uvm_root.svh(579) @ 0: reporter [UVMTOP] UVM testbench topology:
-----------------------------------------------------
Name            Type                      Size  Value
-----------------------------------------------------
uvm_test_top    my_test                   -     @1836
  compA         componentA                -     @1905
    m_put_port  uvm_nonblocking_put_port  -     @1971
  compB         componentB                -     @1936
    m_put_imp   uvm_nonblocking_put_imp   -     @2010
-----------------------------------------------------

UVM_INFO testbench.sv(60) @ 0: uvm_test_top.compA [COMPA] Packet sent to CompB
pkt: (Packet@2048) { addr: 'ha1  data: 'h64  }
UVM_INFO testbench.sv(96) @ 0: uvm_test_top.compB [COMPB] Packet received
pkt: (Packet@2048) { addr: 'ha1  data: 'h64  }
UVM_INFO testbench.sv(66) @ 0: uvm_test_top.compA [COMPA] COMPB was ready to accept and transfer is successful
UVM_INFO testbench.sv(60) @ 0: uvm_test_top.compA [COMPA] Packet sent to CompB
pkt: (Packet@2091) { addr: 'hc1  data: 'hb9  }
UVM_INFO testbench.sv(96) @ 0: uvm_test_top.compB [COMPB] Packet received
pkt: (Packet@2091) { addr: 'hc1  data: 'hb9  }
UVM_INFO testbench.sv(66) @ 0: uvm_test_top.compA [COMPA] COMPB was ready to accept and transfer is successful
UVM_INFO /playground_lib/uvm-1.2/src/base/uvm_objection.svh(1271) @ 0: reporter [TEST_DONE] 'run' phase is ready to proceed to the 'extract' phase
UVM_INFO /playground_lib/uvm-1.2/src/base/uvm_report_server.svh(847) @ 0: reporter [UVM/REPORT/SERVER]
--- UVM Report Summary ---
Nonblocking Behavior
The code snippet in the example shown above can be modified to model try_put in a blocking manner. componentA now uses a do while loop for multiple attempts until try_put is successful.
class componentA extends uvm_component;
   `uvm_component_utils (componentA)

   // Rest of the code remains same

   virtual task run_phase (uvm_phase phase);
     phase.raise_objection(this);
     repeat (m_num_tx) begin
        bit success;
         Packet pkt = Packet::type_id::create ("pkt");
         assert(pkt.randomize ());

        // Print the packet to be displayed in log
         `uvm_info ("COMPA", "Packet sent to CompB", UVM_LOW)
         pkt.print (uvm_default_line_printer);

       // do-while loop uses a "try_put" to keep the sender blocked until the receiver is ready. Return
       // type of the try_put indicates if the transfer was successful. So, lets just try putting
       // the same packet until the receiver returns a 1 indicating successful transfer.
       // Note that this is the same as using "put" but we are doing it with "try_put" and a loop
       do begin
         success = m_put_port.try_put(pkt);
         if (success)
           `uvm_info("COMPA", $sformatf("COMPB was ready to accept and transfer is successful"), UVM_MEDIUM)
         else
           `uvm_info("COMPA", $sformatf("COMPB was NOT ready to accept and transfer failed, try after 1ns"), UVM_MEDIUM)
         #1;
       end while (!success);
      end
     phase.drop_objection(this);
   endtask
endclass
Implementation of the try_put function by componentB is changed to return a random value to model the readiness of the receiver. try_put will return 0 if the receiver is not ready to accept.
class componentB extends uvm_component;
   `uvm_component_utils (componentB)

  // Rest of the code remains same

  // 'try_put' method definition accepts the packet and prints it.
  // Note that it should return 1 if successful so that componentA
  // knows how to handle the transfer return code
  // For purpose of example, lets randomize a variable
  // just to say that this component is ready or not
  virtual function bit try_put (Packet pkt);
    bit ready;
    std::randomize(ready);

    if (ready) begin
      `uvm_info ("COMPB", "Packet received", UVM_LOW)
      pkt.print(uvm_default_line_printer);
      return 1;

    end else begin
    	return 0;
    end
  endfunction

  virtual function bit can_put();
  endfunction
endclass
UVM_INFO @ 0: reporter [RNTST] Running test my_test...
UVM_INFO /playground_lib/uvm-1.2/src/base/uvm_root.svh(579) @ 0: reporter [UVMTOP] UVM testbench topology:
-----------------------------------------------------
Name            Type                      Size  Value
-----------------------------------------------------
uvm_test_top    my_test                   -     @1836
  compA         componentA                -     @1905
    m_put_port  uvm_nonblocking_put_port  -     @1971
  compB         componentB                -     @1936
    m_put_imp   uvm_nonblocking_put_imp   -     @2010
-----------------------------------------------------

UVM_INFO testbench.sv(60) @ 0: uvm_test_top.compA [COMPA] Packet sent to CompB
pkt: (Packet@2048) { addr: 'ha1  data: 'h64  }
UVM_INFO testbench.sv(74) @ 0: uvm_test_top.compA [COMPA] COMPB was NOT ready to accept and transfer failed, try after 1ns
UVM_INFO testbench.sv(125) @ 1: uvm_test_top.compB [COMPB] Packet received
pkt: (Packet@2048) { addr: 'ha1  data: 'h64  }
UVM_INFO testbench.sv(72) @ 1: uvm_test_top.compA [COMPA] COMPB was ready to accept and transfer is successful
UVM_INFO testbench.sv(60) @ 2: uvm_test_top.compA [COMPA] Packet sent to CompB
pkt: (Packet@2104) { addr: 'h68  data: 'h7d  }
UVM_INFO testbench.sv(125) @ 2: uvm_test_top.compB [COMPB] Packet received
pkt: (Packet@2104) { addr: 'h68  data: 'h7d  }
UVM_INFO testbench.sv(72) @ 2: uvm_test_top.compA [COMPA] COMPB was ready to accept and transfer is successful
UVM_INFO /playground_lib/uvm-1.2/src/base/uvm_objection.svh(1271) @ 3: reporter [TEST_DONE] 'run' phase is ready to proceed to the 'extract' phase
UVM_INFO /playground_lib/uvm-1.2/src/base/uvm_report_server.svh(847) @ 3: reporter [UVM/REPORT/SERVER]
--- UVM Report Summary ---
UVM TLM can_put Example
Instead of directly trying to put a packet, the sender can first query to see if the receiver is ready or not with can_put function and then send the packet.
class componentA extends uvm_component;
   `uvm_component_utils (componentA)

   // Rest of the code remains same

   virtual task run_phase (uvm_phase phase);
     phase.raise_objection(this);
     repeat (m_num_tx) begin
        bit success;
         Packet pkt = Packet::type_id::create ("pkt");
         assert(pkt.randomize ());

        // Print the packet to be displayed in log
         `uvm_info ("COMPA", "Packet sent to CompB", UVM_LOW)
         pkt.print (uvm_default_line_printer);

       	// Another way to do the same is to loop until can_put returns a 1. In this case, its is
       	// not even attempted to send a transaction using put, until the sender knows for sure
       	// that the receiver is ready to accept it
       	`uvm_info("COMPA", $sformatf("Waiting for receiver to be ready ..."), UVM_MEDIUM)
       	do begin
         	success = m_put_port.can_put();
       	end while (!success);
       	`uvm_info("COMPA", $sformatf("Receiver is now ready to accept transfers"), UVM_MEDIUM)
       	m_put_port.try_put(pkt);
      end
     phase.drop_objection(this);
   endtask
endclass
The can_put function in componentB is set to return a random value in this example to model readiness of the receiver.
class componentB extends uvm_component;
   `uvm_component_utils (componentB)

  // Rest of the code remains same

  virtual function bit try_put (Packet pkt);
    `uvm_info ("COMPB", "Packet received", UVM_LOW)
    pkt.print(uvm_default_line_printer);
    return 1;
  endfunction

  // Return a random value to model readiness
  virtual function bit can_put();
    return $urandom_range(0,1);
  endfunction
endclass
UVM_INFO @ 0: reporter [RNTST] Running test my_test...
UVM_INFO /playground_lib/uvm-1.2/src/base/uvm_root.svh(579) @ 0: reporter [UVMTOP] UVM testbench topology:
-----------------------------------------------------
Name            Type                      Size  Value
-----------------------------------------------------
uvm_test_top    my_test                   -     @1837
  compA         componentA                -     @1906
    m_put_port  uvm_nonblocking_put_port  -     @1972
  compB         componentB                -     @1937
    m_put_imp   uvm_nonblocking_put_imp   -     @2011
-----------------------------------------------------

UVM_INFO testbench.sv(60) @ 0: uvm_test_top.compA [COMPA] Packet sent to CompB
pkt: (Packet@2049) { addr: 'ha1  data: 'h64  }
UVM_INFO testbench.sv(81) @ 0: uvm_test_top.compA [COMPA] Waiting for receiver to be ready ...
UVM_INFO testbench.sv(85) @ 0: uvm_test_top.compA [COMPA] Receiver is now ready to accept transfers
UVM_INFO testbench.sv(125) @ 0: uvm_test_top.compB [COMPB] Packet received
pkt: (Packet@2049) { addr: 'ha1  data: 'h64  }
UVM_INFO testbench.sv(60) @ 0: uvm_test_top.compA [COMPA] Packet sent to CompB
pkt: (Packet@2059) { addr: 'h24  data: 'hba  }
UVM_INFO testbench.sv(81) @ 0: uvm_test_top.compA [COMPA] Waiting for receiver to be ready ...
UVM_INFO testbench.sv(85) @ 0: uvm_test_top.compA [COMPA] Receiver is now ready to accept transfers
UVM_INFO testbench.sv(125) @ 0: uvm_test_top.compB [COMPB] Packet received
pkt: (Packet@2059) { addr: 'h24  data: 'hba  }
UVM_INFO /playground_lib/uvm-1.2/src/base/uvm_objection.svh(1271) @ 0: reporter [TEST_DONE] 'run' phase is ready to proceed to the 'extract' phase
UVM_INFO /playground_lib/uvm-1.2/src/base/uvm_report_server.svh(847) @ 0: reporter [UVM/REPORT/SERVER]
--- UVM Report Summary ---
The 4-bit counter starts incrementing from 4'b0000 to 4'h1111 and then rolls over back to 4'b0000. It will keep counting as long as it is provided with a running clock and reset is held high.
The rollover happens when the most significant bit of the final addition gets discarded. When counter is at a maximum value of 4'b1111 and gets one more count request, the counter tries to reach 5'b10000 but since it can support only 4-bits, the MSB will be discarded resulting in 0.
	0000
	0001
	0010
	...
	1110
	1111
	       rolls over
	0000
	0001
	...
The design contains two inputs one for the clock and another for an active-low reset. An active-low reset is one where the design is reset when the value of the reset pin is 0. There is a 4-bit output called out which essentially provides the counter values.
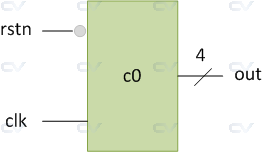
Electronic Counter Design
module counter (  input clk,               // Declare input port for clock to allow counter to count up
                  input rstn,              // Declare input port for reset to allow the counter to be reset to 0 when required
                  output reg[3:0] out);    // Declare 4-bit output port to get the counter values

  // This always block will be triggered at the rising edge of clk (0->1)
  // Once inside this block, it checks if the reset is 0, if yes then change out to zero
  // If reset is 1, then design should be allowed to count up, so increment counter
  always @ (posedge clk) begin
    if (! rstn)
      out <= 0;
    else
      out <= out + 1;
  end
endmodule
It's always best to get started using a very simple example, and none serves the purpose best other than "Hello World !".
// Single line comments start with double forward slash "//"
// Verilog code is always written inside modules, and each module represents a digital block with some functionality
module tb;

  // Initial block is another construct typically used to initialize signal nets and variables for simulation
	initial
		// Verilog supports displaying signal values to the screen so that designers can debug whats wrong with their circuit
		// For our purposes, we'll simply display "Hello World"
		$display ("Hello World !");
endmodule
A module called tb with no input-output ports act as the top module for the simulation. The initial block starts and executes the first statement at time 0 units. $display is a Verilog system task used to display a formatted string to the console and cannot be synthesized into hardware. Its primarily used to help with testbench and design debug. In this case, the text message displayed onto the screen is "Hello World !".
ncsim> run
Hello World !
ncsim: *W,RNQUIE: Simulation is complete.
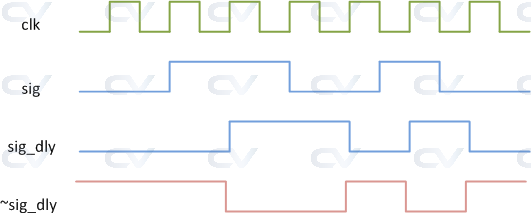
A positive edge detector will send out a pulse whenever the signal it is monitoring changes from 0 to 1 (positive edge).
Design

The idea behind a positive edge detector is to delay the original signal by one clock cycle, take its inverse and perform a logical AND with the original signal.
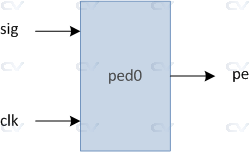
module pos_edge_det ( input sig,            // Input signal for which positive edge has to be detected
                      input clk,            // Input signal for clock
                      output pe);           // Output signal that gives a pulse when a positive edge occurs

    reg   sig_dly;                          // Internal signal to store the delayed version of signal

    // This always block ensures that sig_dly is exactly 1 clock behind sig
	always @ (posedge clk) begin
		sig_dly <= sig;
	end

    // Combinational logic where sig is AND with delayed, inverted version of sig
    // Assign statement assigns the evaluated expression in the RHS to the internal net pe
	assign pe = sig & ~sig_dly;
endmodule
The module shown above is named pos_edge_det and has two inputs and one output. The design aims to detect the positive edge of input sig, and output pe. So we expect to see a pulse on pe whenever sig changes from value 0 to 1.
The conditional if else statement is used to make a decision about whether a statement is executed.
Click here to refresh if else if in Verilog !
SystemVerilog introduced the following if else constructs for violation checks.
unique-if, unique0-if
unique-if evaluates conditions in any order and does the following :
- report an error when none of the
ifconditions match unless there is an explicitelse. - report an erorr when there is more than 1 match found in the
if elseconditions
Unlike unique-if, unique0-if does not report a violation if none of the conditions match
No else block for unique-if
module tb;
	int x = 4;

  	initial begin
      	// This if else if construct is declared to be "unique"
		// Error is not reported here because there is a "else"
      	// clause in the end which will be triggered when none of
      	// the conditions match
    	unique if (x == 3)
      		$display ("x is %0d", x);
    	else if (x == 5)
      		$display ("x is %0d", x);
      	else
      		$display ("x is neither 3 nor 5");

      	// When none of the conditions become true and there
      	// is no "else" clause, then an error is reported
    	unique if (x == 3)
      		$display ("x is %0d", x);
    	else if (x == 5)
      		$display ("x is %0d", x);
  	end
endmodule
ncsim> run
x is neither 3 nor 5
ncsim: *W,NOCOND: Unique if violation:  Every if clause was false.
            File: ./testbench.sv, line = 18, pos = 13
           Scope: tb
            Time: 0 FS + 1

ncsim: *W,RNQUIE: Simulation is complete.
Multiple matches in unique-if
module tb;
	int x = 4;

  	initial begin

      	// This if else if construct is declared to be "unique"
		// When multiple if blocks match, then error is reported
      	unique if (x == 4)
          $display ("1. x is %0d", x);
      	else if (x == 4)
          $display ("2. x is %0d", x);
      	else
          $display ("x is not 4");
  	end
endmodule
ncsim> run
1. x is 4
ncsim: *W,MCONDE: Unique if violation:  Multiple true if clauses at {line=8:pos=15 and line=10:pos=13}.
            File: ./testbench.sv, line = 8, pos = 15
           Scope: tb
            Time: 0 FS + 1

ncsim: *W,RNQUIE: Simulation is complete.
priority-if
priority-if evaluates all conditions in sequential order and a violation is reported when:
- None of the conditions are true or if there's no
elseclause to the finalifconstruct
No else clause in priority-if
module tb;
	int x = 4;

  	initial begin
      	// This if else if construct is declared to be "unique"
		// Error is not reported here because there is a "else"
      	// clause in the end which will be triggered when none of
      	// the conditions match
    	priority if (x == 3)
      		$display ("x is %0d", x);
    	else if (x == 5)
      		$display ("x is %0d", x);
      	else
      		$display ("x is neither 3 nor 5");

      	// When none of the conditions become true and there
      	// is no "else" clause, then an error is reported
    	priority if (x == 3)
      		$display ("x is %0d", x);
    	else if (x == 5)
      		$display ("x is %0d", x);
  	end
endmodule
ncsim> run
x is neither 3 nor 5
ncsim: *W,NOCOND: Priority if violation:  Every if clause was false.
            File: ./testbench.sv, line = 18, pos = 15
           Scope: tb
            Time: 0 FS + 1

ncsim: *W,RNQUIE: Simulation is complete.
Exit after first match in priority-if
module tb;
	int x = 4;

  	initial begin
      	// Exits if-else block once the first match is found
      	priority if (x == 4)
      		$display ("x is %0d", x);
      else if (x != 5)
      		$display ("x is %0d", x);
  	end
endmodule
ncsim> run
x is 4
ncsim: *W,RNQUIE: Simulation is complete.
