Variables are declared random using the rand or randc keyword. They can be used on normal variables, arrays, dynamic arrays or queues.
rand
class Packet;
	rand int   		count;
	rand byte  		master [$];
	rand bit [7:0]  data [];

	...
endclass
What are direct tests ?
Verification engineers will first create something known as a verification plan that details every feature of the design required to be tested in RTL simulations and how each test will create independent scenarios that target a particular feature.
For example, if there's a peripheral that needs its registers to be configured such that it starts an AXI bus transaction, then we would have different tests to configure those registers differently and achieve a good coverage.
These are direct tests where each test does a particular task to accomplish something.
What are randomized tests ?
Complex designs have a lot of scenarios and many corner cases that are better verified by randomized tests and take much less effort and time. Taking the same example from above, a test will configure the peripheral registers with random values every time the test is run with a different seed thereby achieving different scenarios for every run. This will ensure that we hit corner cases and uncover any hidden bugs.
Constraints
SystemVerilog allows users to specify constraints in a compact, declarative way which are then processed by an internal solver to generate random values that satisfy all conditions. Basically constraints are nothing more than a way to let us define what legal values should be assigned to the random variables. A normal variable is declared to be random by the keyword rand.
class Pkt;
	rand bit [7:0] addr;
	rand bit [7:0] data;

	constraint addr_limit { addr <= 8'hB; }
endclass
The example above declares a class called Pkt with a constraint on its address field. Note that both its properties are prefixed with the rand keyword which tells the solver that these variables should be randomized when asked to. The constraint is called addr_limit and specifies that the solver can allot any random value for the address that is below or equal to 8'h8. Since the 8-bit variable addr is of type bit, it can have any value from 0 to 255, but with the constraint valid values will be limited to 11.
As you can see, this powerful feature will allow us to create variables that are constrained within ranges that are valid for the design and will have a much better verification impact. In the next few sessions, we'll see how to effectively use different constructs within SystemVerilog that allow us to describe constraints in a better way.
- SystemVerilog Constraint Examples
- SystemVerilog Randomization
- SystemVerilog rand Variables
- SystemVerilog Constraint Blocks
- SystemVerilog Implication Constraint
- SystemVerilog Constraint 'inside'
- SystemVerilog Static Constraints
- SystemVerilog foreach Constraint
- SystemVerilog Inline Constraints
- SystemVerilog Soft Constraints
- SystemVerilog Disable Constraints
- SystemVerilog pre_randomize & post_randomize
- SystemVerilog Disable Randomization
- SystemVerilog randcase
- SystemVerilog Array Randomization
- Bus Protocol Constraints
- Memory Partitioning Example
A module is the fundamental construct used for building designs. Each module can contain hierarchies of other modules, nets, variables and other procedural blocks to describe any hardware functionality. The testbench on the other hand is a complete environment to verify the design and hence an emphasis is placed on the way it is modeled to make it more re-usable and effective. It must be properly initialized and synchronized avoiding race conditions between the design and the testbench.
What is the need for a program block ?
SystemVerilog program block was introduced for the following reasons.
- To provide an entry point to the execution of testbenches
- To create a container to hold all other testbench data such as tasks, class objects and functions
- Avoid race conditions with the design by getting executed during the reactive region of a simulation cycle
The reactive region is one of the last few phases before simulation time advances, and by then all design element statements would have been executed and testbench will see the updated value. It is important to have this demarcation between the execution of design and testbench statements because it will give a more deterministic output between simulators.
Syntax
program [name] [port_list];
	...
endprogram
Examples
	program test1 (input clk, reset);
		initial ...
	endprogram

	program test2 (interface wb_if);
		initial ...
	endprogram

	program test3;
		initial ...
	endprogram
A program block can be nested within modules and interfaces and hence multiple programs within the same module can share variables local to that scope. In the example below, mode is a local variable within tb and can be accessed by both programs p1 and p2.
module tb;
	bit [3:0] mode;

	program p1;
		...
	endprogram

	program p2;
		...
	endprogram
endmodule
Creation of user-defined phases in UVM is a possibility although it may hinder in complete re-usability of the testbench. There are chances for components to go out of sync and cause errors related to null pointer handles. But, in case you decide that you have to use one for your project, keep reading.
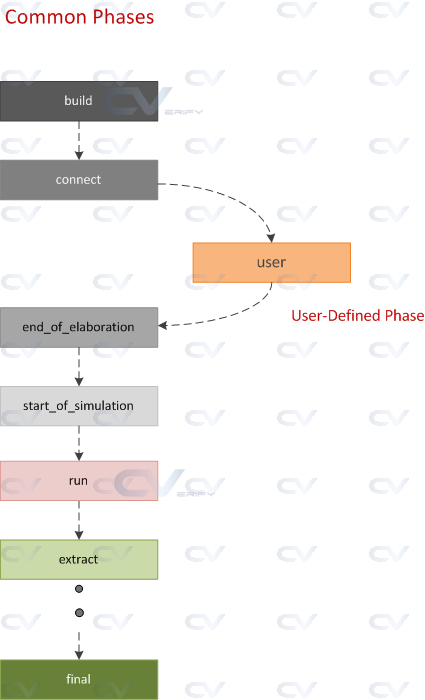
Some of the main steps to using a custom phase are:
- Create and define a new phase class
- Add the new phase to an existing schedule
- Use the new phase in a component that supports this phase
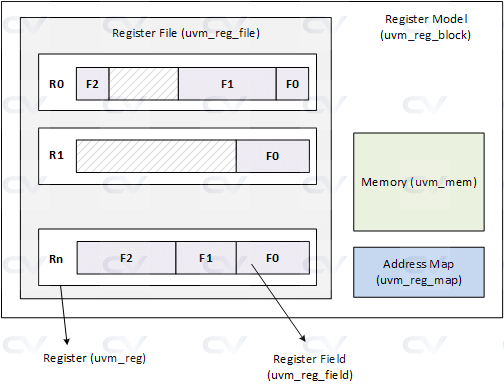
What is a register model ?
A register model, provide a structured and standardized way to model and verify the registers and memory-mapped structures within a digital design. It consists of a hierarchy of blocks represented by UVM class objects that are structured equivalent to the registers and memory in design.
Since typical designs contain hundreds of registers, register model generation is usually done by custom scripts or standard software tools like RalGen from Synopsys or RGM from Cadence. These tools take the register specification as an input such as an IPXACT XML file and generates a SystemVerilog file which contains fields and registers specified using standard UVM register classes.
// Sample IPXACT register specification

<spirit:usage>register</spirit:usage>
	<spirit:register>
    	<spirit:name>REG_CTL</spirit:name>
      	<spirit:addressOffset>0x0</spirit:addressOffset>
      	<spirit:size>32</spirit:size>
      	<spirit:reset>
         	<spirit:value>0x2A</spirit:value>
      	</spirit:reset>
      	<spirit:access>read-write</spirit:access>
      	<spirit:field>
          <spirit:name>EN</spirit:name>
          <spirit:description>Enable the module</spirit:description>
          <spirit:bitOffset>0</spirit:bitOffset>
          <spirit:bitWidth>1</spirit:bitWidth>
          <spirit:access>read-write</spirit:access>
      </spirit:field>

      ...
UVM RAL Classes

| Class | Description |
|---|---|
| uvm_reg_field | Used for register field implementation |
| uvm_reg | Used to implement design register |
| uvm_reg_file | Used to collect a group of registers |
| uvm_reg_map | Represents an address map |
| uvm_mem | Used to represent memory in design |
| uvm_reg_block | Container class to store registers, maps and memories |
uvm_reg_field
uvm_reg_field is a class that is used to model individual fields within a register. Fields in a register represent specific bits or groups of bits that have distinct functionalities, access permissions, reset values, and other attributes.
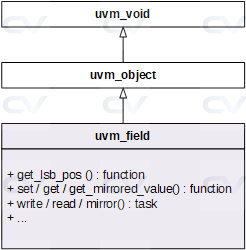
These are some of the most commonly used methods in uvm_reg_field. Please refer to the UVM reference manual to see the full set of methods.
	// Configure the register field class
	extern function void configure(uvm_reg        parent, 		// Parent register handle
                                   int unsigned   size, 		// Bit-width of the field
                                   int unsigned   lsb_pos, 		// LSB index of the field in register
                                   string         access, 		// Read/read-write/etc access policy
                                   bit            volatile,
                                   uvm_reg_data_t reset,
                                   bit            has_reset,
                                   bit            is_rand,
                                   bit            individually_accessible);


	// Get width of the field, in number of bits
	extern virtual function int unsigned get_n_bits();

	// Returns index of LSB of the field in the register that instantiates it
	extern virtual function int unsigned get_lsb_pos();

	// Set desired value in the regmodel for this field
	extern virtual function void set(uvm_reg_data_t  value,
                                    string          fname = "",
                                    int             lineno = 0);

	// Get desired value in regmodel for this field
	extern virtual function uvm_reg_data_t get(string fname = "",
                                              int    lineno = 0);

	// Get mirrored value in regmodel for this field
	extern virtual function uvm_reg_data_t get_mirrored_value(string fname = "",
                                               				 int    lineno = 0);
Here is an example of how user register field of type uvm_reg_field is instantiated and configured inside a register.
	// Declare register field handle
	uvm_reg_field 	m_enable;

	// Create an instance and configure the register field handle
	m_enable = uvm_reg_field::type_id::create("m_enable");
	m_enable.configure(this, 1, 0, "RW", 0, 1'h0, 1, 1, 1);
uvm_reg
uvm_reg is a base class provided by the UVM library that is used to model registers, and user defined classes are extended from this base class.
These are some of the most commonly used methods in uvm_reg.
   // Get fields of this register as a queue
   extern virtual function void get_fields (ref uvm_reg_field fields[$]);

   // Get a particular field by name
   extern virtual function uvm_reg_field get_field_by_name(string name);

   // Get address of this register
   extern virtual function uvm_reg_addr_t get_address (uvm_reg_map map = null);

   // Set desired value in regmodel
   extern virtual function void set (uvm_reg_data_t  value,
                                     string          fname = "",
                                     int             lineno = 0);

   // Get desired value in regmodel
   extern virtual function uvm_reg_data_t  get(string  fname = "",
                                               int     lineno = 0);

   // Get last known design value
   extern virtual function uvm_reg_data_t  get_mirrored_value(string  fname = "",
                                               int     lineno = 0);

   // Issue a register write with the given value
   extern virtual task write(output uvm_status_e      status,
                             input  uvm_reg_data_t    value,
                             input  uvm_door_e        path = UVM_DEFAULT_DOOR,
                             input  uvm_reg_map       map = null,
                             input  uvm_sequence_base parent = null,
                             input  int               prior = -1,
                             input  uvm_object        extension = null,
                             input  string            fname = "",
                             input  int               lineno = 0);

   // Issue a register read and get value into the given variable
   extern virtual task read(output uvm_status_e      status,
                            output uvm_reg_data_t    value,
                            input  uvm_door_e        path = UVM_DEFAULT_DOOR,
                            input  uvm_reg_map       map = null,
                            input  uvm_sequence_base parent = null,
                            input  int               prior = -1,
                            input  uvm_object        extension = null,
                            input  string            fname = "",
                            input  int               lineno = 0);

   // Update design if desired value is not same as mirrored value
   extern virtual task update(output uvm_status_e      status,
                              input  uvm_door_e        path = UVM_DEFAULT_DOOR,
                              input  uvm_reg_map       map = null,
                              input  uvm_sequence_base parent = null,
                              input  int               prior = -1,
                              input  uvm_object        extension = null,
                              input  string            fname = "",
                              input  int               lineno = 0);

   // Update regmodel with mirrored value
   extern virtual task mirror(output uvm_status_e      status,
                              input uvm_check_e        check  = UVM_NO_CHECK,
                              input uvm_door_e         path = UVM_DEFAULT_DOOR,
                              input uvm_reg_map        map = null,
                              input uvm_sequence_base  parent = null,
                              input int                prior = -1,
                              input  uvm_object        extension = null,
                              input string             fname = "",
                              input int                lineno = 0);
Here is an example of a user register extended from uvm_reg base class.
class reg_ctl extends uvm_reg;
	rand uvm_reg_field  En;

	function new (string name = "reg_ctl");
		super.new (name, 32, UVM_NO_COVERAGE);
	endfunction

	virtual function void build ();
		// Create object instance for each field
		this.En     = uvm_reg_field::type_id::create ("En");

		// Configure each field
		this.En.configure (this, 1, 0, "RW", 0, 1'h0, 1, 1, 1);
	endfunction
endclass
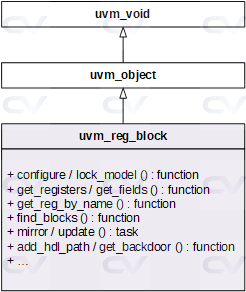
uvm_reg_block
A uvm_reg_block can contain registers, register files, memories and sub-blocks.
	// Get queue of registers
   extern virtual function void get_registers (ref uvm_reg regs[$],
                                               input uvm_hier_e hier=UVM_HIER);

	// Get register block by name
  extern virtual function uvm_reg_block get_block_by_name (string name);

	// Get register by name
   extern virtual function uvm_reg get_reg_by_name (string name);

	// Get field by name
   extern virtual function uvm_reg_field get_field_by_name (string name);

	// Update registers in this reg block
   extern virtual task update(output uvm_status_e       status,
                              input  uvm_door_e         path = UVM_DEFAULT_DOOR,
                              input  uvm_sequence_base  parent = null,
                              input  int                prior = -1,
                              input  uvm_object         extension = null,
                              input  string             fname = "",
                              input  int                lineno = 0);
What are desired and mirrored values ?
Every register in the model corresponds to an actual hardware register in the design. There are two kinds of variables inside the register within a model.
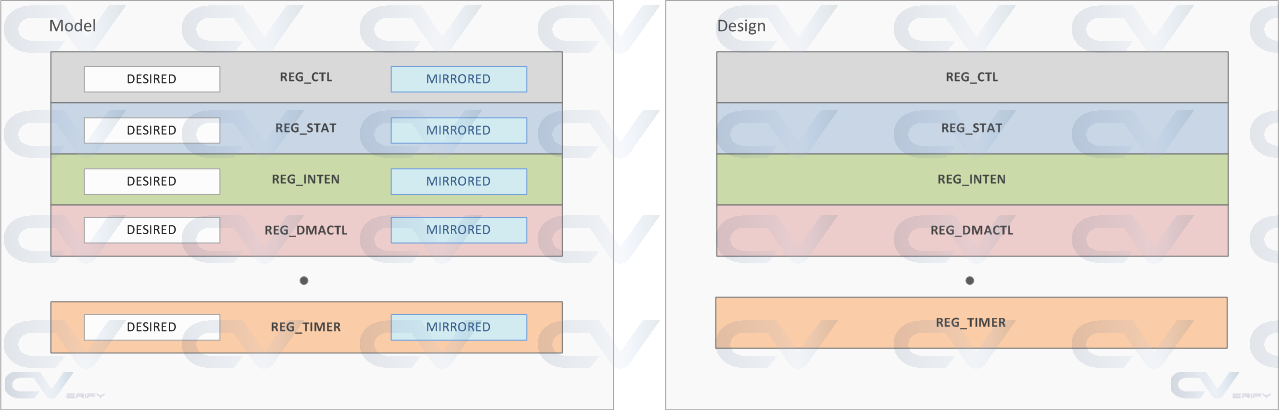
Desired value is what we the design to have. In other words, the model has an internal variable to store a desired value that can be updated later in the design. For example, if we want the register REG_STAT in the design to have a value of 0x1234_5678, then the desired value of that register has to be set to 0x1234_5678 within the model and an update task should be called for this to be reflected in the design.

