An unpacked array is used to refer to dimensions declared after the variable name.
Unpacked arrays may be fixed-size arrays, dynamic arrays, associative arrays or queues.
Single Dimensional Unpacked Array
module tb;
	byte 	stack [8]; 		// depth = 8, 1 byte wide variable

	initial begin
		// Assign random values to each slot of the stack
		foreach (stack[i]) begin
			stack[i] = $random;
			$display ("Assign 0x%0h to index %0d", stack[i], i);
		end

		// Print contents of the stack
		$display ("stack = %p", stack);
	end
endmodule
Assign 0x24 to index 0
Assign 0x81 to index 1
Assign 0x9 to index 2
Assign 0x63 to index 3
Assign 0xd to index 4
Assign 0x8d to index 5
Assign 0x65 to index 6
Assign 0x12 to index 7
stack = '{'h24, 'h81, 'h9, 'h63, 'hd, 'h8d, 'h65, 'h12}
Multidimensional Unpacked Array
module tb;
  byte 	stack [2][4]; 		// 2 rows, 4 cols

	initial begin
		// Assign random values to each slot of the stack
		foreach (stack[i])
          foreach (stack[i][j]) begin
            stack[i][j] = $random;
            $display ("stack[%0d][%0d] = 0x%0h", i, j, stack[i][j]);
			end

		// Print contents of the stack
		$display ("stack = %p", stack);
	end
endmodule
ncsim> run
stack[0][0] = 0x24
stack[0][1] = 0x81
stack[0][2] = 0x9
stack[0][3] = 0x63
stack[1][0] = 0xd
stack[1][1] = 0x8d
stack[1][2] = 0x65
stack[1][3] = 0x12
stack = '{'{'h24, 'h81, 'h9, 'h63}, '{'hd, 'h8d, 'h65, 'h12}}
ncsim: *W,RNQUIE: Simulation is complete.
Packed + Unpacked Array
The example shown below illustrates a multidimensional packed + unpacked array.
module tb;
  bit [3:0][7:0] 	stack [2][4]; 		// 2 rows, 4 cols

	initial begin
		// Assign random values to each slot of the stack
		foreach (stack[i])
          foreach (stack[i][j]) begin
            stack[i][j] = $random;
            $display ("stack[%0d][%0d] = 0x%0h", i, j, stack[i][j]);
			end

		// Print contents of the stack
		$display ("stack = %p", stack);

		// Print content of a given index
        $display("stack[0][0][2] = 0x%0h", stack[0][0][2]);
	end
endmodule
ncsim> run
stack[0][0] = 0x12153524
stack[0][1] = 0xc0895e81
stack[0][2] = 0x8484d609
stack[0][3] = 0xb1f05663
stack[1][0] = 0x6b97b0d
stack[1][1] = 0x46df998d
stack[1][2] = 0xb2c28465
stack[1][3] = 0x89375212
stack = '{'{'h12153524, 'hc0895e81, 'h8484d609, 'hb1f05663}, '{'h6b97b0d, 'h46df998d, 'hb2c28465, 'h89375212}}
stack[0][0][2] = 0x15
ncsim: *W,RNQUIE: Simulation is complete.
In a multidimensional declaration, the dimensions declared before the name vary more faster than the dimensions following the name.
bit 	[1:4] 		m_var 	[1:5]			// 1:4 varies faster than 1:5
bit 				m_var2 	[1:5] [1:3]  	// 1:3 varies faster than 1:5
bit 	[1:3] [1:7] m_var3; 				// 1:7 varies faster than 1:3

bit 	[1:3] [1:2] m_var4 [1:7] [0:2] 		// 1:2 varies most rapidly, followed by 1:3, then 0:2 and then 1:7
UVM automation macros also include mechanisms to pack class variables into a bit or byte stream, and unpack a bit stream and populate the class contents. This is particularly useful when dealing with serial forms of communication like SPI, I2C and RS-232.
There are three main functions available to pack and unpack.
| Method | Description |
|---|---|
| pack | Performs a bit-wise concatenation of the class contents into an array of type bit |
| pack_bytes | Performs a bit-wise concatenation of the class contents into an array of type byte |
| pack_ints | Performs a bit-wise concatenation of the class contents into an array of type int |
| unpack | Extracts property values from an array of type bit and stores into correct class variable |
| unpack_bytes | Extracts property values from an array of type byte and stores into correct class variable |
| unpack_ints | Extracts property values from an array of type int and stores into correct class variable |
In the following examples, usage of all the three types of functions will be explored.
Using automation macros
Pack
A class called Packet is defined with some variables to store address and data, and is registered with `uvm_field_int macros to enable automation. UVM_DEFAULT specifies that all the default automation methods should be applied to the given variable.
Note that the order of variables as listed within `uvm_object_utils_* will be used for both packing and unpacking data.
class Packet extends uvm_object;
  rand bit [3:0] m_addr;
  rand bit [3:0] m_wdata;
  rand bit [3:0] m_rdata;
  rand bit 		 m_wr;

  `uvm_object_utils_begin(Packet)
  	`uvm_field_int(m_addr, 	UVM_DEFAULT)
  	`uvm_field_int(m_wdata, UVM_DEFAULT)
  	`uvm_field_int(m_rdata, UVM_DEFAULT)
  	`uvm_field_int(m_wr,		UVM_DEFAULT)
  `uvm_object_utils_end

  function new(string name = "Packet");
    super.new(name);
  endfunction
endclass
Let us create a test class called pack_test where an object of Packet is created, randomized and packed.
class pack_test extends uvm_test;
  `uvm_component_utils(pack_test)
  function new(string name = "pack_test", uvm_component parent=null);
    super.new(name, parent);
  endfunction

  // Declare some arrays to store packed data output from different pack functions
  bit 						m_bits[];
  byte unsigned		m_bytes[];
  int  unsigned		m_ints[];

  virtual function void build_phase(uvm_phase phase);

  	// First create an object of class "Packet", randomize and print its contents
    Packet m_pkt = Packet::type_id::create("Packet");
    m_pkt.randomize();
    m_pkt.print();

    // Now, call "pack", "pack_bytes", and "pack_ints" and pass appropriate array type
    m_pkt.pack(m_bits);
    m_pkt.pack_bytes(m_bytes);
    m_pkt.pack_ints(m_ints);

    // Print the array contents
    `uvm_info(get_type_name(), $sformatf("m_bits=%p", m_bits), UVM_LOW)
    `uvm_info(get_type_name(), $sformatf("m_bytes=%p", m_bytes), UVM_LOW)
    `uvm_info(get_type_name(), $sformatf("m_ints=%p", m_ints), UVM_LOW)
  endfunction
endclass

module tb;
	initial begin
		run_test("pack_test");
	end
endmodule
See that the function pack returned an array of bits, pack_bytes returned an array of bytes and pack_ints returned an array of ints. Note that pack_bytes padded 0 to the content from m_wr to turn it from 1 to 8.
UVM_INFO @ 0: reporter [RNTST] Running test pack_test...
--------------------------------
Name       Type      Size  Value
--------------------------------
Packet     Packet    -     @1907
  m_addr   integral  4     'hd
  m_wdata  integral  4     'h9
  m_rdata  integral  4     'h6
  m_wr     integral  1     'h1
--------------------------------
UVM_INFO testbench.sv(74) @ 0: uvm_test_top [pack_test] m_bits='{'h1, 'h1, 'h0, 'h1, 'h1, 'h0, 'h0, 'h1, 'h0, 'h1, 'h1, 'h0, 'h1}
UVM_INFO testbench.sv(75) @ 0: uvm_test_top [pack_test] m_bytes='{'hd9, 'h68}
UVM_INFO testbench.sv(76) @ 0: uvm_test_top [pack_test] m_ints='{3647471616}
UVM_INFO /playground_lib/uvm-1.2/src/base/uvm_report_server.svh(847) @ 0: reporter [UVM/REPORT/SERVER]
Unpack
Let us create a different test class called unpack_test which will create two Packet objects, but randomize only one of them leaving the other empty. Then pack contents of the first object into an array, and then unpack it into the second object and display its contents. Repeat the same thing with other types of pack functions.
class unpack_test extends uvm_test;
  `uvm_component_utils(unpack_test)
  function new(string name = "unpack_test", uvm_component parent=null);
    super.new(name, parent);
  endfunction

  // Declare a few arrays to hold packed data for each type of "pack" function
  bit 					m_bits[];
  byte unsigned	m_bytes[];
  int  unsigned	m_ints[];

  // Variables to hold return value from pack function
  int m_val1, m_val2, m_val3;

  virtual function void build_phase(uvm_phase phase);
    Packet m_pkt = Packet::type_id::create("Packet");
    Packet m_pkt2 = Packet::type_id::create("Packet");

    `uvm_info(get_type_name(), $sformatf("Start pack"), UVM_LOW)
    // Randomize the first object, print and pack into bit array, then display
    m_pkt.randomize();
    m_pkt.print();
    m_pkt.pack(m_bits);
    `uvm_info(get_type_name(), $sformatf("packed m_bits=%p", m_bits), UVM_LOW)

    // Randomize the first object, print and pack into byte array, then display
    m_pkt.randomize();
    m_pkt.print();
    m_pkt.pack_bytes(m_bytes);
    `uvm_info(get_type_name(), $sformatf("packed m_bytes=%p", m_bytes), UVM_LOW)

    // Randomize the first object, print and pack into int array, then display
    m_pkt.randomize();
    m_pkt.print();
    m_pkt.pack_ints(m_ints);
    `uvm_info(get_type_name(), $sformatf("packed m_ints=%p", m_ints), UVM_LOW)

    `uvm_info(get_type_name(), $sformatf("Start unpack"), UVM_LOW)
    // Now unpack the packed bit array into the second object, and display
    m_val1 = m_pkt2.unpack(m_bits);
    `uvm_info(get_type_name(), $sformatf("unpacked m_val1=0x%0h", m_val1), UVM_LOW)
    m_pkt2.print();

    // Now unpack the packed byte array into the second object, and display
    m_val2 = m_pkt2.unpack_bytes(m_bytes);
    `uvm_info(get_type_name(), $sformatf("unpacked m_val2=0x%0h", m_val2), UVM_LOW)
    m_pkt2.print();

    // Now unpack the packed int array into the second object, and display
    m_val3 = m_pkt2.unpack_ints(m_ints);
    `uvm_info(get_type_name(), $sformatf("unpacked m_val3=0x%0h", m_val3), UVM_LOW)
    m_pkt2.print();
  endfunction
endclass

module tb;
	initial begin
		run_test("unpack_test");
	end
endmodule
Remember that the order in which it is packed should be same as the order in which it is unpacked. Any change in packer policy regarding order may cause the results to be different.
UVM_INFO @ 0: reporter [RNTST] Running test unpack_test...
UVM_INFO testbench.sv(93) @ 0: uvm_test_top [unpack_test] Start pack
--------------------------------
Name       Type      Size  Value
--------------------------------
Packet     Packet    -     @1907
  m_addr   integral  4     'hd
  m_wdata  integral  4     'h9
  m_rdata  integral  4     'h6
  m_wr     integral  1     'h1
--------------------------------
UVM_INFO testbench.sv(95) @ 0: uvm_test_top [unpack_test] packed m_bits='{'h1, 'h1, 'h0, 'h1, 'h1, 'h0, 'h0, 'h1, 'h0, 'h1, 'h1, 'h0, 'h1}
--------------------------------
Name       Type      Size  Value
--------------------------------
Packet     Packet    -     @1907
  m_addr   integral  4     'h8
  m_wdata  integral  4     'he
  m_rdata  integral  4     'h4
  m_wr     integral  1     'h0
--------------------------------
UVM_INFO testbench.sv(100) @ 0: uvm_test_top [unpack_test] packed m_bytes='{'h8e, 'h40}
--------------------------------
Name       Type      Size  Value
--------------------------------
Packet     Packet    -     @1907
  m_addr   integral  4     'h9
  m_wdata  integral  4     'he
  m_rdata  integral  4     'he
  m_wr     integral  1     'h1
--------------------------------
UVM_INFO testbench.sv(105) @ 0: uvm_test_top [unpack_test] packed m_ints='{2666004480}
UVM_INFO testbench.sv(109) @ 0: uvm_test_top [unpack_test] Start unpack
UVM_INFO testbench.sv(109) @ 0: uvm_test_top [unpack_test] unpacked m_val1=0xd
--------------------------------
Name       Type      Size  Value
--------------------------------
Packet     Packet    -     @1909
  m_addr   integral  4     'hd
  m_wdata  integral  4     'h9
  m_rdata  integral  4     'h6
  m_wr     integral  1     'h1
--------------------------------
UVM_INFO testbench.sv(113) @ 0: uvm_test_top [unpack_test] unpacked m_val2=0xd
--------------------------------
Name       Type      Size  Value
--------------------------------
Packet     Packet    -     @1909
  m_addr   integral  4     'h8
  m_wdata  integral  4     'he
  m_rdata  integral  4     'h4
  m_wr     integral  1     'h0
--------------------------------
UVM_INFO testbench.sv(117) @ 0: uvm_test_top [unpack_test] unpacked m_val3=0xd
--------------------------------
Name       Type      Size  Value
--------------------------------
Packet     Packet    -     @1909
  m_addr   integral  4     'h9
  m_wdata  integral  4     'he
  m_rdata  integral  4     'he
  m_wr     integral  1     'h1
--------------------------------
UVM_INFO /playground_lib/uvm-1.2/src/base/uvm_report_server.svh(847) @ 0: reporter [UVM/REPORT/SERVER]
Automation macros introduce a lot of new code and is not generally recommemded to be used
Using do_pack/do_unpack
Just like print, copy and compare, pack and unpack also has user definable hooks called do_pack and do_unpack.
class Packet extends uvm_object;
  rand bit [3:0] m_addr;
  rand bit [3:0] m_wdata;
  rand bit [3:0] m_rdata;
  rand bit 		 m_wr;

  `uvm_object_utils(Packet)

  // Define do_print, so that print method displays contents of this class
  virtual function void do_print(uvm_printer printer);
    super.do_print(printer);
    printer.print_field_int("m_addr", m_addr, $bits(m_addr), UVM_HEX);
    printer.print_field_int("m_wdata", m_wdata, $bits(m_wdata), UVM_HEX);
    printer.print_field_int("m_rdata", m_rdata, $bits(m_rdata), UVM_HEX);
    printer.print_field_int("m_wr", m_wr, $bits(m_wr), UVM_HEX);
  endfunction

  virtual function void do_pack(uvm_packer packer);
    super.do_pack(packer);
    packer.pack_field_int(m_addr, $bits(m_addr));
    packer.pack_field_int(m_wdata, $bits(m_wdata));
    packer.pack_field_int(m_rdata, $bits(m_rdata));
                          packer.pack_field_int(m_wr, $bits(m_wr));
  endfunction

  virtual function void do_unpack(uvm_packer packer);
    super.do_pack(packer);
    m_addr = packer.unpack_field_int($bits(m_addr));
    m_wdata = packer.unpack_field_int($bits(m_wdata));
    m_rdata = packer.unpack_field_int($bits(m_rdata));
                                      m_wr = packer.unpack_field_int($bits(m_wr));
  endfunction

  function new(string name = "Packet");
    super.new(name);
  endfunction
endclass
The same set of tests shown above can be run with this class and will yield the same results.
UVM uses the concept of a factory where all objects are registered with it so that it can return an object of the requested type when required. The utility macros help to register each object with the factory.
UVM also introduces a bunch of automation mechanisms for implementing print , copy , and compare objects and are defined using the field macros.
Utility Macros
The utils macro is used primarily to register an object or component with the factory and is required for it to function correctly. It is required to be used inside every user-defined class that is derived from uvm_object which includes all types of sequence items and components.
Object Utility
All classes derived directly from uvm_object or uvm_transaction require them to be registered using `uvm_object_utils macro. Note that it is mandatory for the new function to be explicitly defined for every class, and takes the name of the class instance as an argument.
class ABC extends uvm_object;

	// Register this user defined class with the factory
	`uvm_object_utils(ABC)

	function new(string name = "ABC");
		super.new(name);
	endfunction
endclass
Component Utility
All classes derived directly or indirectly from uvm_component require them to be registered with the factory using `uvm_component_utils macro. Note that it is mandatory for the new function to be explicitly defined for every class derived directly or indirectly from uvm_component and takes the name of the class instance and a handle to the parent class where this object is instantiated.
class DEF extends uvm_component;

	// Class derived from uvm_component, register with factory
	`uvm_component_utils(DEF)

	function new(string name = "DEF", uvm_component parent=null);
		super.new(name, parent);
	endfunction
endclass
Macro Expansion: Behind the Scenes
`uvm_object_utils eventually gets expanded into its *_begin and *_end form with nothing between the begin and end. *_begin implements other macros required for the correct functionality of UVM factory.
// Empty uvm_object_utils macro
`define uvm_object_utils(T)
  `uvm_object_utils_begin(T)
  `uvm_object_utils_end

`define uvm_object_utils_begin(T)
   `m_uvm_object_registry_internal(T,T)     // Sub-macro #1
   `m_uvm_object_create_func(T)  			 // Sub-macro #2
   `m_uvm_get_type_name_func(T)  			 // Sub-macro #3
   `uvm_field_utils_begin(T)				 // Sub-macro #4

// uvm_object_utils_end simply terminates a function started
// somewhere in the middle
`define uvm_object_utils_end
     end
   endfunction
It can be seen from the code shown below that each macro expanded by *_begin implements some functions required for factory operation and performs the following steps.
- Implements
get_typestatic method which basically returns a factory proxy object for the requested type. - Implements
create, which instantiates an object of the specified type by calling its constructor with no arguments. - Implements
get_type_namemethod which returns the type as a string - Registers the type with UVM factory
// Sub-macro #1. Implement the functions "get_type()" and "get_object_type()"
`define m_uvm_object_registry_internal(T,S)
   typedef uvm_object_registry#(T,`"S`") type_id;
   static function type_id get_type();
     return type_id::get();
   endfunction
   virtual function uvm_object_wrapper get_object_type();
     return type_id::get();
   endfunction

// Sub-macro #2. Implement the function "create()"
`define m_uvm_object_create_func(T)
   function uvm_object create (string name="");
     T tmp;
`ifdef UVM_OBJECT_DO_NOT_NEED_CONSTRUCTOR
     tmp = new();
     if (name!="")
       tmp.set_name(name);
`else
     if (name=="") tmp = new();
     else tmp = new(name);
`endif
     return tmp;
   endfunction

// Sub-macro #3. Implement the function "get_type_name()"
`define m_uvm_get_type_name_func(T)
   const static string type_name = `"T`";
   virtual function string get_type_name ();
     return type_name;
   endfunction

// Sub-macro #4. Implement field automation macros
`define uvm_field_utils_begin(T)
   function void __m_uvm_field_automation (uvm_object tmp_data__,
                                     int what__,
                                     string str__);
...
In a similar way, `uvm_component_utils_* also has equivalent macros and function calls. Note that the create function for components take two arguments, name and parent, unlike that of an object.
Paratemerized classes should use `uvm_object_param_utils_* since they do not have to give a type during factory registration.
Creation of class object
It is recommended that all class objects are created by calling the type_id::create() method which is already defined using the macro `m_uvm_object_create_func. This makes any child class object to be created and returned using factory mechanism and promotes testbench flexibility and reusability.
class ABC extends uvm_object;
	`uvm_object_utils(ABC)

	function new(string name = "ABC");
		super.new(name);
	endfunction
endclass

class base_test extends uvm_test;
	`uvm_component_utils(base_test)

	function new(string name = "base_test", uvm_component parent=null);
		super.new(name, parent);
	endfunction

	virtual function void build_phase(uvm_phase phase);

		// An object of class "ABC" is instantiated in UVM by calling
		// its "create()" function which has been defined using a macro
		// as shown above
		ABC abc = ABC::type_id::create("abc_inst");
	endfunction
endclass
Field Macros
`uvm_field_* macros that were used between *_begin and *_end utility macros are basically called field macros since they operate on class properties and provide automatic implementations of core methods like copy, compare and print. This helps the user save some time from implementing custom do_copy, do_compare and do_print functions for each and every class. However, since these macros are expanded into general code, it may impact simulation performance and are generally not recommended.
Usage Example
class ABC extends uvm_object;
	rand bit [15:0] 	m_addr;
	rand bit [15:0] 	m_data;

	`uvm_object_utils_begin(ABC)
		`uvm_field_int(m_addr, UVM_DEFAULT)
		`uvm_field_int(m_data, UVM_DEFAULT)
	`uvm_object_utils_end

	function new(string name = "ABC");
		super.new(name);
	endfunction
endclass
The `uvm_field_* corresponding to the data type of each variable should be used. For example, variables of type int, bit, byte should use `uvm_field_int, while variables of type string should use `uvm_field_string and so on. The macro accepts atleast two arguments: ARG and FLAG.
| Argument | Description |
|---|---|
| ARG | Name of the variable, whose type should be appropriate for the macro that is used |
| FLAG | When set to something other than UVM_DEFAULT or UVM_ALL_ON, it specifies which data method implementations will not be included. For example, if FLAG is set to NO_COPY, everything else will be implemented for the variable except copy. |
The field FLAG can take the following values and multiple values can be OR'ed together. A combination of these flags determine the kind of operations that are allowed to be done on the given variable.
| Flag | Description |
|---|---|
| UVM_ALL_ON | All operations are turned on |
| UVM_DEFAULT | Enables all operations and equivalent to UVM_ALL_ON |
| UVM_NOCOPY | Do not copy the given variable |
| UVM_NOCOMPARE | Do not compare the given variable |
| UVM_NOPRINT | Do not print the given variable |
| UVM_NOPACK | Do not pack or unpack the given variable |
| UVM_REFERENCE | Operate only on handles, i.e. for object types, do not do deep copy, etc |
Along with control on operations, `uvm_field_* macros also provide some control on the radix of the given variable which can take the following values. This value can be OR'ed with the operational flags listed in the table above. UVM_HEX is the default radix if none is specified.
| Radix | Description |
|---|---|
| UVM_BIN | Print/record the given variable in binary format |
| UVM_DEC | Print/record the given variable in decimal format |
| UVM_HEX | Print/record the given variable in hexadecimal format |
| UVM_OCT | Print/record the given variable in octal format |
| UVM_STRING | Print/record the given variable in string format |
| UVM_TIME | Print/record the given variable in time format |
See more examples of field macros in print , copy , and compare and pack
What is UVM ?
UVM stands for Universal Verification Methodology. It is a standardized methodology for verifying digital designs and systems-on-chip (SoCs) in the semiconductor industry. UVM is built on top of the SystemVerilog language and provides a framework for creating modular, reusable testbench components that can be easily integrated into the design verification process. It also includes a set of guidelines and best practices for developing testbenches, as well as a methodology for running simulations and analyzing results.
UVM has become the de facto standard for design verification in the semiconductor industry, and is widely used by chip designers and verification engineers to verify the correctness and functionality of their designs.
What was used before UVM ?
OVM (Open Verification Methodology) was introduced in 2008 as an open-source verification methodology for digital designs and systems-on-chip (SoCs) and was based on SystemVerilog
UVM was introduced in 2011 as a successor to OVM, and it built upon the concepts and principles of OVM. UVM was designed to be a more standardized and flexible methodology that could be easily adapted to different verification environments and use cases.
Why was OVM replaced by UVM ?
This was done mainly for the following reasons :
- Standardization: OVM was an open-source methodology that lacked a formal standard, which made it difficult for different organizations and tools to interoperate effectively. UVM was designed to be a more standardized methodology, with a well-defined standard that could be adopted by the entire semiconductor industry.
- Flexibility: OVM was designed primarily for transaction-level modeling (TLM), which limited its applicability to other verification scenarios, such as register-transfer level (RTL) modeling. UVM was designed to be more flexible, with support for both TLM and RTL modeling, as well as other verification scenarios.
- Reusability: OVM provided a set of pre-defined classes and components for creating testbenches, but these components were not always modular and reusable. UVM was designed to be more modular and reusable, with a clear separation between testbench components and the design-under-test (DUT).
- Maintainability: OVM was not always easy to maintain or update, as changes to the methodology could affect existing testbenches and components. UVM was designed to be more maintainable, with a clear separation between the methodology and the implementation of testbenches and components.
What does UVM contain ?
It contains a set of pre-defined classes and methods that enable users to create modular, reusable testbench components for verifying digital designs and systems-on-chip (SoCs). Some of the key components of UVM include:
- Testbench Components: UVM provides a set of base classes that can be extended to create testbench components, such as drivers, monitors, scoreboards, and agents.
- Transactions: Transactions are used to model the communication between the design-under-test (DUT) and the testbench. UVM provides a transaction class that can be extended to create transaction objects that carry information between the DUT and the testbench.
- Phases: UVM defines a set of simulation phases that enable users to control the order in which testbench components are created, initialized, and executed.
- Messaging and Reporting: UVM provides a messaging and reporting infrastructure that enables users to output information about the simulation, such as warnings, errors, and debug information.
- Configuration: UVM provides a configuration database that allows users to store and retrieve configuration information for testbench components.
- Functional Coverage: UVM provides a mechanism for tracking functional coverage, which is used to ensure that the design has been thoroughly tested.
- Register Abstraction Layer: UVM provides a register abstraction layer (RAL) that simplifies the process of creating and accessing register maps.
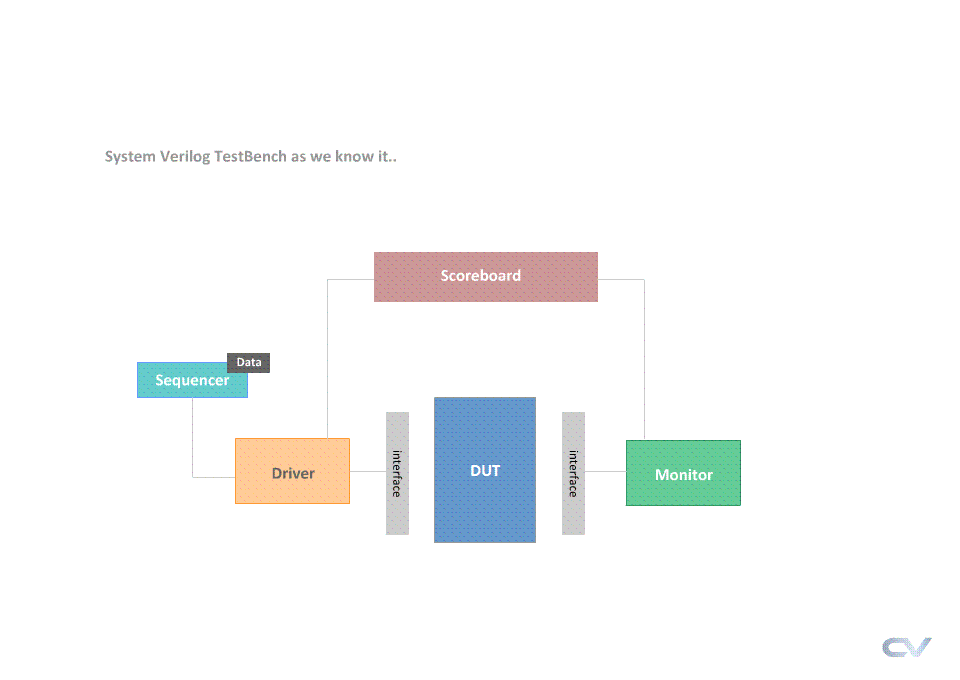
For example, the image below shows how a typical verification environment is built by extending readily available UVM classes which are denoted by uvm_* prefix. These components already have the necessary code that will let them connect between each other, handle data packets and work synchronously with others.
It also undergoes many revisions where new features are added and some older ones deprecated. The reference manual for UVM can be obtained here and contains description on class hierarchy, functions and tasks. It might be overwhelming for new users to understand UVM because of its extensive API. So it requires a more disciplined approach to understand the framework part by part. Hopefully, you'll find the information in these pages useful.
What are some of the prerequisites for learning UVM ?
UVM is based on the SystemVerilog language, so you should have a basic understanding of SystemVerilog syntax and constructs, such as classes, inheritance, and randomization. This knowledge will help you understand the UVM code and develop your own UVM-based testbenches.
You should be familiar with simulation tools, such as Cadence Incisive, Mentor Graphics Questa, or Synopsys VCS, which are commonly used in digital design verification. This knowledge will help you run and debug UVM-based testbenches using these tools.
You should have a basic understanding of verification methodologies, such as directed testing, constrained random testing, and coverage-driven verification. This knowledge will help you understand the role of UVM in the overall verification process and how to use UVM to implement these methodologies.
Click here to refresh SystemVerilog concepts !
The inside keyword in SystemVerilog allows to check if a given value lies within the range specified using the inside phrase. This can also be used inside if and other conditional statements in addition to being used as a constraint.
Syntax
	<variable> inside {<values or range>}

	// Inverted "inside"
	!(<variable> inside {<values or range>})
For example,
	m_var inside {4, 7, 9} 		// Check if m_var is either 4,7 or 9
	m_var inside {[10:100]} 	// Check if m_var is between 10 and 100 inclusive
When used in conditional statements
In the following example, inside operator is used both in an if else statement and a ternary operator. flag gets the value 1 if the randomized value of m_data lies within 4 to 9, including 4 and 9. If not, flag gets 0.
Similarly, if else block uses the same operator and prints a display message.
module tb;
	bit [3:0] 	m_data;
	bit 		flag;

	initial begin
		for (int i = 0; i < 10; i++) begin
			m_data = $random;

			// Used in a ternary operator
			flag = m_data inside {[4:9]} ? 1 : 0;

			// Used with "if-else" operators
			if (m_data inside {[4:9]})
				$display ("m_data=%0d INSIDE [4:9], flag=%0d", m_data, flag);
			else
				$display ("m_data=%0d outside [4:9], flag=%0d", m_data, flag);


		end
	end
endmodule
ncsim> run
m_data=4 INSIDE [4:9], flag=1
m_data=1 outside [4:9], flag=0
m_data=9 INSIDE [4:9], flag=1
m_data=3 outside [4:9], flag=0
m_data=13 outside [4:9], flag=0
m_data=13 outside [4:9], flag=0
m_data=5 INSIDE [4:9], flag=1
m_data=2 outside [4:9], flag=0
m_data=1 outside [4:9], flag=0
m_data=13 outside [4:9], flag=0
ncsim: *W,RNQUIE: Simulation is complete.
Used in constraints
The inside operator is quite useful in constraints and makes code shorter and more readable.
class ABC;
	rand bit [3:0] 	m_var;

	// Constrain m_var to be either 3,4,5,6 or 7
	constraint c_var { m_var inside {[3:7]}; }
endclass

module tb;
	initial begin
		ABC abc = new();
		repeat (5) begin
			abc.randomize();
			$display("abc.m_var = %0d", abc.m_var);
		end

	end
endmodule
See that all values of m_var lies inside the given range.
ncsim> run
abc.m_var = 7
abc.m_var = 6
abc.m_var = 6
abc.m_var = 3
abc.m_var = 4
ncsim: *W,RNQUIE: Simulation is complete.
Inverted inside
The opposite of what the inside operator does can be achieved by placing a not symbol ! before it. This is applicable for both constraints and conditional statements. The following example is the same as we saw before except that its constraint has been tweaked to reflect an inverted inside statement.
class ABC;
	rand bit [3:0] 	m_var;

	// Inverted inside: Constrain m_var to be outside 3 to 7
	constraint c_var { !(m_var inside {[3:7]}); }
endclass

module tb;
	initial begin
		ABC abc = new();
		repeat (5) begin
			abc.randomize();
			$display("abc.m_var = %0d", abc.m_var);
		end

	end
endmodule
See that all values of m_var lies inside the given range.
ncsim> run
abc.m_var = 1
abc.m_var = 12
abc.m_var = 0
abc.m_var = 14
abc.m_var = 10
ncsim: *W,RNQUIE: Simulation is complete.
Practical Example
Say we have a memory located between the address range 0x4000 and 0x5FFF, which is partitioned into two. The first part is used to store instructions and the second part to store data. Say we want to randomize the address for data such that the address falls within the data part of memory, we can easily use the inside operator.
class Data;
	rand bit [15:0] 	m_addr;

	constraint c_addr 	{ m_addr inside {[16'h4000:16'h4fff]}; }
endclass

module tb;
	initial begin
		Data data = new();
		repeat (5) begin
			data.randomize();
			$display ("addr = 0x%0h", data.m_addr);
		end
	end
endmodule
ncsim> run
addr = 0x48ef
addr = 0x463f
addr = 0x4612
addr = 0x4249
addr = 0x4cee
ncsim: *W,RNQUIE: Simulation is complete.
